Using VPN to access Shared & Personal Files
Introduction
A VPN, or Virtual Private Network, is a tool that allows you to connect into a network that you aren't physically in front of. At YPC, we use this to access internal tools & documents. This guide will go over how to use your VPN to access our shared folders from your personal or company provided computer.

Note: When you close the VPN application, it actually minimizes to your system tray, which is in the bottom right, by the clock. Some users have reported network slowdowns that have been resolved by right clicking & closing the VPN application. So when you're not using the VPN, verify that the application has completely closed by right click closing it from the system tray as pictured.
Who is this guide for?
This guide is for anyone who already has the Global VPN Client  application installed & configured. This should be the case on all YPC company owned devices. You can check by hitting Start
  on your keyboard, then type "Global" and see if the Global VPN Client appears (pictured left). Open the application & verify a connection called "YPC" is present (pictured right). If the application is not installed, or the YPC connection is not present, please refer back to this **guide on installing & configuring sonicwall**.
Connecting to the VPN
Step 1) Hit Start, type "Global", & open "Global VPN Client". You may want to pin this to your taskbar.
Step 2) Select "YPC", & "Enable"
Step 3) Enter pre-shared key y3ll0w585 - This only has to be entered the first time you connect.
Step 4) Type your credentials. These would be the same credentials you use to log into your YPC Computer or your YPC Email - without the "@ypcmedia.com"
At this point, you should see that the YPC Connection is listed as "Connected", as shown in the screenshot below.

Accessing Shared Drives
Once you're connected to the VPN, we need to access our shared directories. If you have a PC provided by YPC Media, this should be as easy as going to This PC, and you'll see your Shared Drive & Personal Drive listed, which you can access as soon as you connect to the VPN. If they're not there, this section of the guide will show you how to add them.

Here's a screenshot of what you'd expect to see under "This PC" if you've already got drives mapped. If you don't see this, continue this guide.

Accessing Shared Drives on my personal computer:
If all you need to do is access a shared location occasionally, you might opt to navigate to them manually. To do this, enter either location into your address bar of your explorer (file browser) window.
Shared Drive: The entire YPC Media Shared Drive
\\roc1\shared$
Personal Drive: Your own private folder, no one can access this but you & upper management.
\\roc1\username$
Personal Folder: This is a personal folder in a public space. Anyone can access this. This is a convenient method of sharing files & collaborating with other users.
\\roc1\shared$\personal folders\
Mapping Drives for regular access:
More than likely you won't need to access these locations just once, and so an easy solution to get back here is to map the drives. This process should be done for you on a company owned PC, but can be done on a personal machine as well, as removing these drives is as simple as right click & removing.
Step 1) Go to "This PC". You can get here by typing "This PC" in the start menu, or by selecting it on the side bar of your explorer window (file browser, you can get here with shortcut Windows Key + E).
Step 2) Once you're at "This PC", hit "Computer" on the top & then "Map Network Drive"


We're going to map two network drives, so we'll go through this process twice. In this tutorial, we use drive letters P & S, however, the drive letter used is not important, so if you're using either letter already, just pick another.
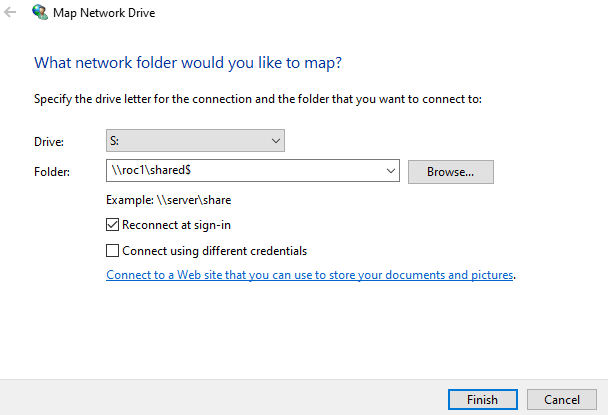
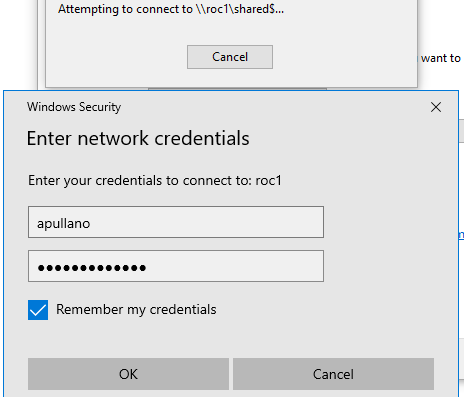
Step 3) Select Drive S, and for Folder, type \\roc1\shared$ - Leave the default options checked, as pictured. Click Finish. Type your username & password, and Remember My Credentials if it's a private computer.


Step 4) Repeat this process for your personal drive. This time we'll use drive P, and the location will be \\roc1\username$ where we replace 'username' with your own username.
Step 5) Verify everything worked by navigating to "This PC" again. At the bottom you should see two new network locations corresponding with your shared & personal drive.

Related Articles
Installing & Configuring VPN Client
Introduction This guide is intended for home users that are using their own hardware. Follow the steps of this guide to install & configure your VPN access, then head over to this guide for steps on accessing shared documents. Note: When you close ...Your new YPC Computer
Introduction The purpose of this document is to help a new user get acquainted with their new computer as well as the account's you'll be responsible for. This primarily consists of your Microsoft Account, Zoho Account, Google Account, & Legacy CRM ...Dialpad - Managing Coaching Teams
Managing Dialpad Coaching Teams Coaching teams are used predominately for monitoring, recording access, and local presence. Most coaching team settings, including creating new teams, will be managed by tech, so this guide will just focus on managing ...Handling Dialpad When Going on Vacation/Leave
Introduction If you are planning to go on vacation or take leave, you'll need to adjust your Dialpad settings to ensure that your calls are handled correctly during your absence. This guide will walk you through the process of modifying your Dialpad ...